Color transform
Contents
2. Color transform
import matplotlib.pyplot as plt
import cv2
package |
rgb <-> bgr |
rgb to gray |
gray to rgb |
|---|---|---|---|
cv2 |
import cv2 |
gray_img = cv2.cvtColor(cv_rgb, cv2.COLOR_RGB2GRAY) |
gray_to_rgb = cv2.cvtColor(gray_img, cv2.COLOR_GRAY2BGR) |
skimage |
import matplotlib.pyplot as plt |
||
plt |
import matplotlib.pyplot as plt |
2.1. RGB 與 BGR 轉換
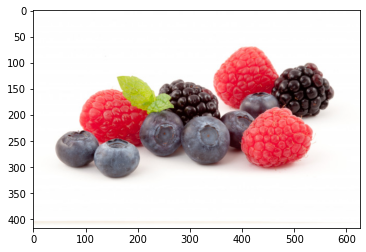
cv_bgr = cv2.imread("imgs/fruits-2.jpg")

plt.imshow(cv_bgr);

可以看到,這張圖跟我想的不一樣,藍色的地方,本來應該是紅色的。這是因為讀進來時,預設是 BGR 的通道
我們可以透過 cv2 的
cvtColor()來轉換,例如:
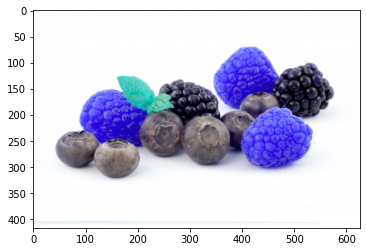
cv_rgb = cv2.cvtColor(cv_bgr, cv2.COLOR_BGR2RGB)
plt.imshow(cv_rgb);

也可以轉回來
cv_bgr = cv2.cvtColor(cv_rgb, cv2.COLOR_RGB2BGR)
plt.imshow(cv_bgr);

也可以不要用 function,就用 array 的特性來改就好
cv_rgb = cv_bgr[:,:,::-1]
plt.imshow(cv_rgb);
cv_bgr = cv_rgb[:,:,::-1]
plt.imshow(cv_bgr);
2.2. 彩色轉灰階
cv2 的彩色轉灰階的公式為:
gray = (np.round(0.2989xR + 0.5870xG + 0.1140xB)).astype("uint8")可以看到,他給三個通道不同的權重,以G通道最多,再來是R,最後是B。而且算完後,會先四捨五入,再轉成 uint8 (0~255無號整數)
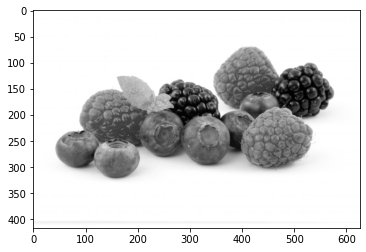
用 cv2 的 function,就可以把 RGB轉灰階,或 BGR 轉灰階,如下:
gray_img = cv2.cvtColor(cv_rgb, cv2.COLOR_RGB2GRAY)
print(f"The data type of image is : {gray_img.dtype}")
print(f"The shape of image is : {gray_img.shape}")
plt.imshow(gray_img, cmap = "gray");
The data type of image is : uint8
The shape of image is : (417, 626)

可以看到,轉成灰階後,通道被拿掉了
再來看看,BGR 轉灰階,作法一樣:
gray_img = cv2.cvtColor(cv_bgr, cv2.COLOR_BGR2GRAY)
print(f"The data type of image is : {gray_img.dtype}")
print(f"The shape of image is : {gray_img.shape}")
plt.imshow(gray_img, cmap = "gray");
The data type of image is : uint8
The shape of image is : (417, 626)

自己用公式來轉也可以
def my_rgb_to_gray(rgb_img):
    r = rgb_img[:,:,0]
    g = rgb_img[:,:,1]
    b = rgb_img[:,:,2]
    gray = 0.2989*r + 0.5870*g + 0.1140*b
    gray = np.round(gray)
    return gray.astype("uint8")

gray_img2 = my_rgb_to_gray(cv_rgb)
print(f"The data type of image is : {gray_img2.dtype}")
print(f"The shape of image is : {gray_img2.shape}")
plt.imshow(gray_img2, cmap = "gray");
The data type of image is : uint8
The shape of image is : (417, 626)
如果用
skimage,就這樣做:
import matplotlib.pyplot as plt
from skimage import color

img_rgb = plt.imread("imgs/fruits-2.jpg")
img_gray = color.rgb2gray(img_rgb)

print(f"The data type of image is : {gray_img.dtype}")
print(f"The shape of image is : {img_gray.shape}")
plt.imshow(img_gray, cmap = "gray");
The data type of image is : uint8
The shape of image is : (417, 626)

可以看到,shape也是把通道拿掉了。但轉換公式沒查,不確定是不是和 cv2 一樣
2.3. 灰階轉彩色(新增通道)
open cv 的轉換公式為:color image = [gray_img, gray_img, gray_img]
所以,就是灰階影像,幫你重複三次
要注意的是,原本的 gray_img 要是
uint8的 data type,如果不是,要先幫他轉一下
gray_to_rgb = cv2.cvtColor(gray_img, cv2.COLOR_GRAY2BGR)
print(f"The shape of image is : {gray_to_rgb.shape}")
plt.imshow(gray_to_rgb);
The shape of image is : (417, 626, 3)

2.4. 其他應用
opencv 的書 (CH4-3~4-7) 還有很多內容,這等之後再整理了
4-3: HSV 色彩空間, BGR/RGB <-> HSV
4-4: 拆分 channel
4-5: 合併 channel
4-6: 拆分與合併 channel 的應用 (色調 Hue 調整, 飽和 Saturation 調整, 明度 Value 調整)
4-7: alpha 通道